| Forum | Marketplace | Knowledge Base | | H1 site | H2 site | H3 site | |

The Hummer Knowledge Base
|
Tools and Materials:
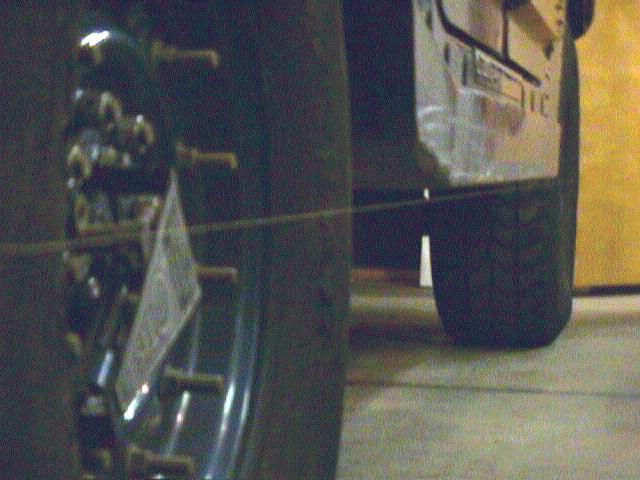
Measurement Procedure: Note: All pictures and diagrams are of the passenger side of the Hummer. Therefore, unless noted otherwise, the front of the vehicle is to the right in these pictures and diagrams. Click on any photo/diagram for a larger version. Positioning the Truck: The Hummer should be parked on a flat, nearly level surface. It should be loaded as typically used (you can ignore the fact that you, the driver are not in the truck). The truck should be rolled (i.e. driven) to this position. Once positioned, you should not lift or jack up any of the tires, or any other part of the truck. If some part of the truck has been lifted, roll the truck at least 20 feet away, and then roll it back. The tires should be inflated to the pressure typically used. If any of the corners of the truck is significantly higher or lower than the others (i.e. bent or broken spring, or other suspension damage), this method cannot be used. Inspect each wheel for damage. All tires and wheels should be the same. (e.g. 4 MT's or 4 GSA's on 4 factory two-piece wheels or 4 one-piece wheels.) Positioning the String: The string is placed around the tires of the Hummer. The string is positioned near the center of the wheels, and low enough that it does not come into contact with the body or rocker panel protection. Picture below shows the string in position. The string should be fairly taught.
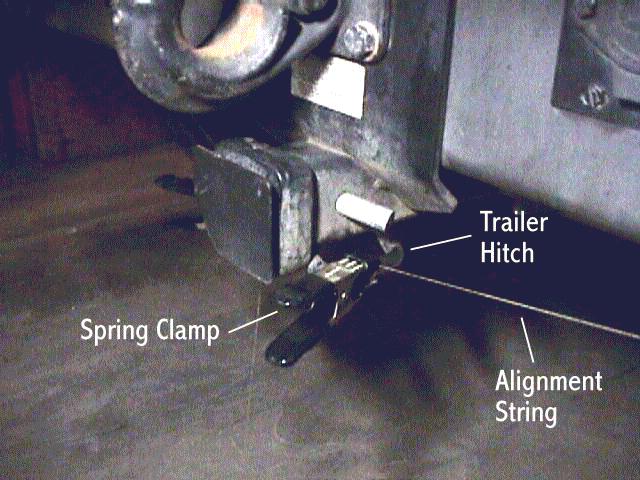
 I use a string long enough to go all the way around the truck. I start at the trailer hitch by fastening one end of the string to one of the safety chain loops. I use a spring clamp to hold it. I carefully place the string in position on all four tires, and clamp the other end of the string to the other side of the trailer hitch. This is shown below:
 Once the string is in place make sure of the following:
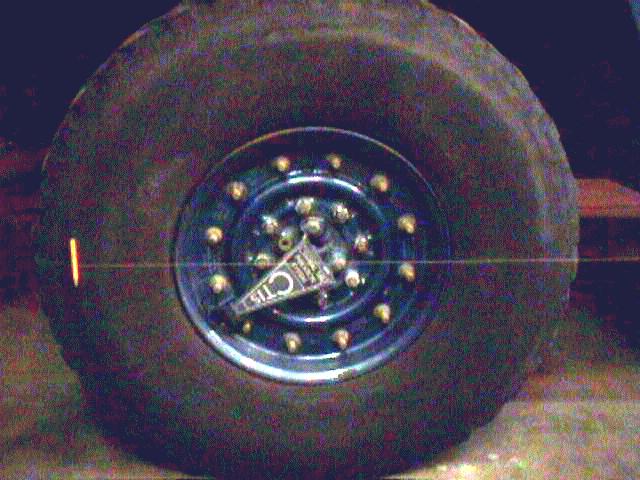
Measuring the Toe-in, Rear: According to specifications, the rear tires should be slightly farther apart in the front than in the rear (negative toe-in). The string should, therefore, be in contact with the sidewall of the tire both in the front and the rear of the rear tire. If the string is not in contact with the sidewall at the front of the rear tire, then that tire has positive toe-in. If the rear tire has negative toe-in (as it should), it can be measured as follows: Place a spacer between the tire and the string. The spacer should be light enough that the tension on the string holds it in place. Position the spacer aft of the point where the string comes in contact with the sidewall of the tire. The approximate position is shown below:
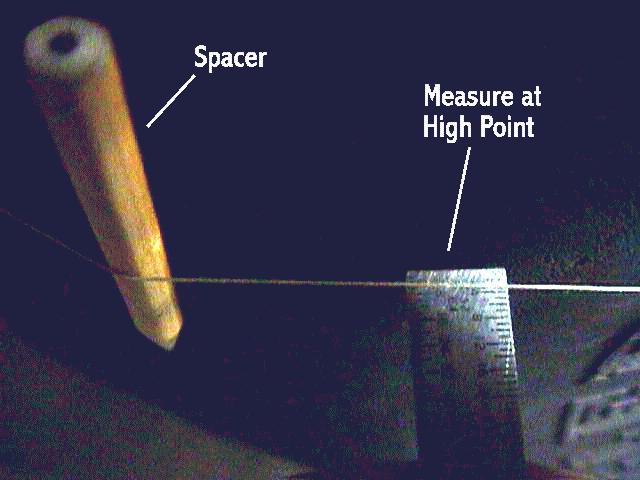
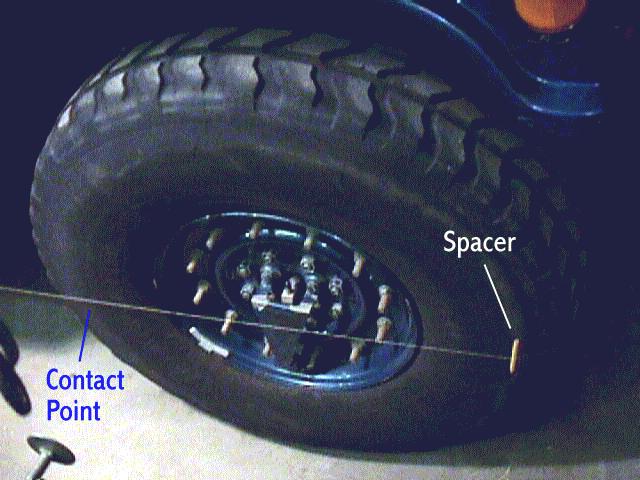
 Move the spacer along the contour of the sidewall of the tire until the string is raised off of the sidewall at the rear of the tire enough that the string is just touching the sidewall at the front of the tire. Picture below shows the spacer and the contact point:
 Diagram below shows this same positioning in an exaggerated fashion:
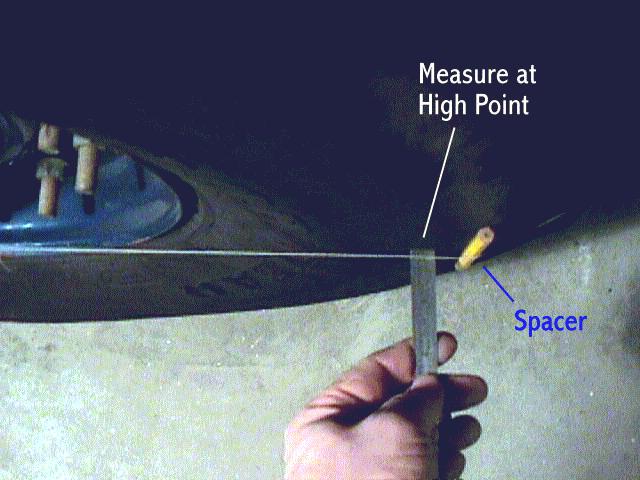
 Once the spacer is positioned, the measurement can be made. Picture below and Diagram above both illustrate where the measurement is made.
 On the rear, the measurements, and adjustments, are made separately for each wheel. Do one rear side, then do the other side. Note: If the front tires are not centered, the rear measurements will not be accurate. Measuring the Toe-in, Front: According to specifications, the front tires should be slightly closer together in the front than in the rear (positive toe-in). The string should, therefore, be in contact with the sidewall of the tire both in the front and the rear of the rear tire. If the string is not in contact with the sidewall at the rear of the front tire, then that tire has negative toe-in. If one front shows positive and the other negative, turn the steering wheel until both tires read the same (i.e. either both positive, or both negative). The positioning of the spacer for the front is similar to that for the rear except that the spacer is placed at the front of the tire, and the measurement is made at the rear. Picture below shows the spacer and the contact point:
 Picture below shows the measurement being taken in the front. The two front tires must each be measured, and the distances added together.
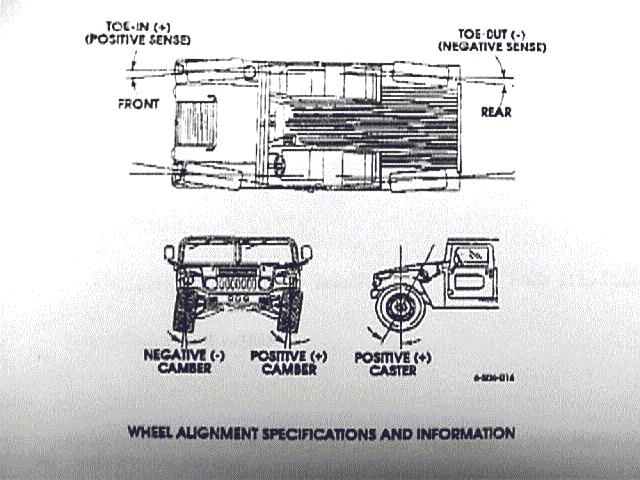
 The Numbers: The rear tires measurements should be between 0 and 1/8" each, and should not differ from each other by more than 1/16". The front tire measurements (when added together) should be between 0 and 1/4" total. Document below shows what is meant by positive and negative toe-in. (From the AMG service bulletin.)
 Making Adjustments: If one (or more) of the wheels is incorrectly adjusted, the following procedures can be used to adjust them. Rear: The radius arms control the rear toe-in alignment. They are located just in front of the control arms. Picture below shows the passenger side radius arm. (This picture was taken from in front of the rear tire, looking toward the rear of the truck.)
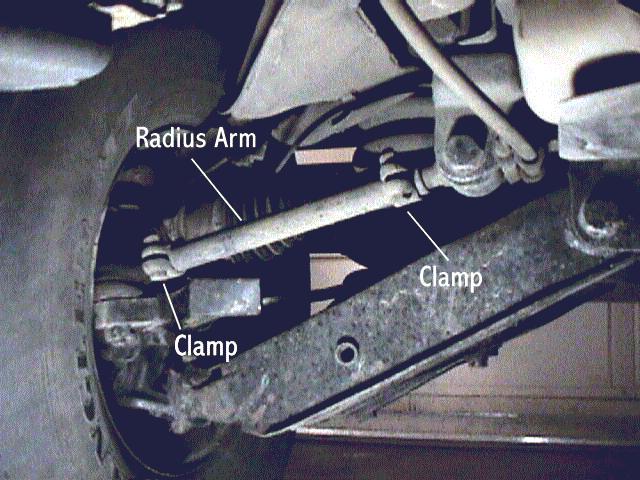 The radius arm can be lengthen or shortened to adjust toe-in. To adjust it, loosen both clamps and turn the center portion using a pipe wrench. Turning in one directin with lengthen the arm, the other direction will shorten it. Re-tighten the clamps when finished. Clamp position is not critical. Each side must be adjusted separately. Front: The tie-rods control the front toe-in alignment. They are located just behind the control arms. They look very much like the radius arms in the rear. (Refer to picture under "Measuring the Toe-in, Rear:" for the rear radius arms). Before loosening the clamps, carefully note their positions. If the clamps are not returned to these positions when finished, the front wheel balancing weights could be damaged or knocked off. The tie-rods can be lengthened or shortened similar to the radius arms in the rear. Loosen both clamps, and turn the center portion with a pipe wrench. Unlike the rear, only one side needs to be adjusted in the front. (This is because the measurements are added together.) Which side to adjust depends upon whether the steering wheel in centered when the front tires are positioned in the center. If it is centered exactly, adjust both tie-rods by the same amount. If the steering wheel points to the right, you should either lengthen the tie-rod on the left, or shorten the one on the right. If the steering wheel points the other way, reverse this selection of which tie-rod to adjust. Re-tighten the clamps when finished. Be sure to position the clamps properly to avoid damage or loss of wheel weights. Re-measure after the adjustment. Note: As you adjust the toe-in, the tire will be turning against the surface the truck is parked on. Because the tire will twist somewhat, it may not be possible to get the exact adjustment desired. My recommendation is to over-adjust a little, and then return to the desired adjustment before tightening the clamps. After the adjustment has been made, you should re-measure the toe-in. To get an accurate measurement, roll the truck about 20 feet or so, and then roll it back. (Be sure to remove the string first!) Then replace the string, and repeat the measurement process for all four wheels. Sticking Adjustment Arms: The radius arms and tie-rods often become rusted or muddied to the point where it can be very difficult to turn them and make the desired adjustment. Here are some suggestions for getting them loose:
Centering the steering wheel: Sometimes the alignment will be within specifications and the steering wheel will not be centered. (This often happens when you adjust the wrong wheel to bring the toe-in into specifications.) If necessary, re-center your steering wheel. This is either a one- or two-step process depending on the amount of change. The turn-signal cancel device is located on the steering shaft (not the steering wheel.) To adjust the steering wheel, remove the cover (says Hummer, three phillips screws), remove the nut and pull off the wheel. Re-insert the steering wheel in the correct position, and replace the nut. AM General recommends replacing the nut with a new one each time it is removed. If the turn signals do not properly cancel it is necessary to detach the shaft from the steering box (under the hood may be easiest) and set the cancel prong (visible with the steering wheel removed) in centered the correct position. It then will be necessary to re-install and re-center the steering wheel. Source of Information: The original source of this method is not known to the author. It was first described to me by Charles Piper on the HML. The source of the alignment specifications is "AMG Service Information Bulletin 96-06-01" dated 3-96.
This method will help to align the toe angles, but only if the ride height / track width is exactly the same front and rear. This method will NOT align either caster or camber, both of which are affected by ride height. Many Hummers were built with the "zero toe" components. This means that ride height on these vehicles does not affect toe angles. Dave B.
|