Forum | Marketplace | Knowledge Base | | H1 site | H2 site | H3 site
Click Here To Visit The Hummer Club
Click Here To Visit Adventure Accessories
Click here for a listing of all HUMMER Network sponsors

Hummer Knowledge Base

The Hummer Knowledge Base


Differential Output Shaft Seal Replacement:

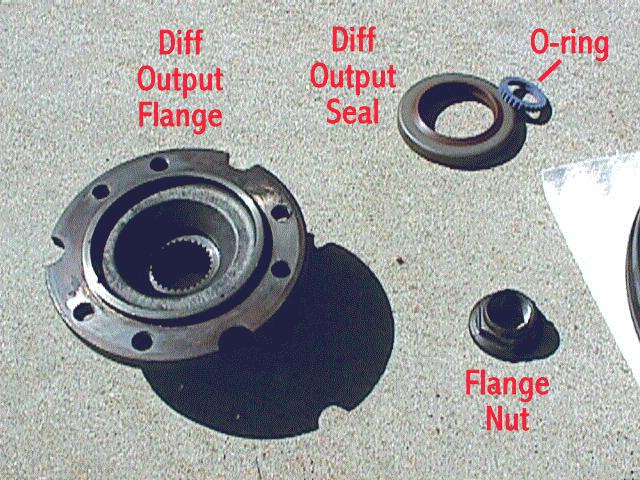
Here are some photos of the Hummer Differential Output Shaft Seal replacement process.

Dave Breggin '95 Diesel Wagon

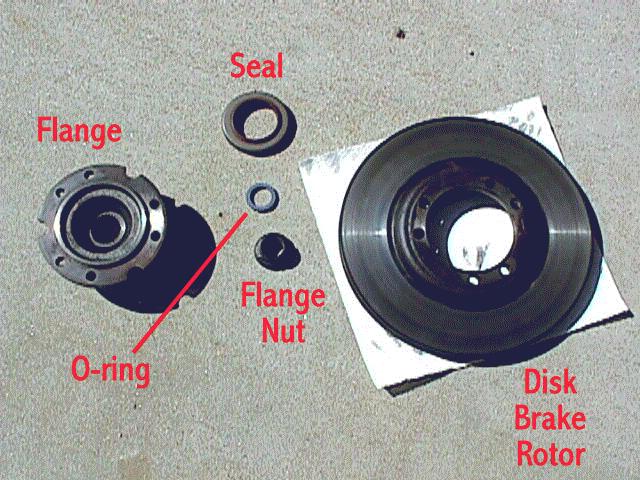
Differential Output Flange, Disk Rotor, Seal and O-ring


Closeup of Output Flange, Seal, O-ring, and Flange Nut


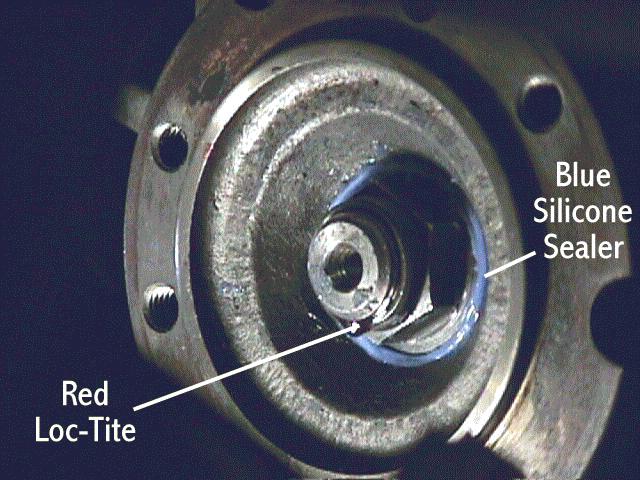
Closeup of Output Flange after installation. Use a silicone sealer on the O-ring, and use Red Loc-Tite on the nut.


Geared Hub Output Shaft Seal Replacement:

I have recently install all 4 geared hub output seals on my Hummer (94). They are the same as the military. Do you have the new type seals? The new seals come in two parts, the old type seals have only one part. I will describe how to install the new seals. If you have the old seals, just skip the part that does not apply. The new seals have a dust seal and an oil seal. The oil seal has the metal rim around it and the dust seal is all rubber. All Hummers have to have the oil seal.

  1. The dust seal is a round rubber seal with a larger thick back and a smaller thinner center which protrudes out from the larger thick back part. This seal is installed on the spindle shaft, not on the geared hub assembly. The larger thicker part of the seal goes over the shaft and against the spindle. The thinner part that protrudes will face inward towards the geared hub. Make sure you put some grease on the outside of this seal, very important!!!!! You have to stretch it a bit to get it over the axle shaft shaft but that is normal. That is all for this seal.

  2. The oil seal, the one with the metal around it has to be installed correctly. In other words you can install it backwards. If you look at the rubber part of the seal, you will see that the rubber part is not perpendicular to the metal part of the seal but at a slight angle. It is beveled. You want the beveled part facing in towards the geared hub. In other words if you have a circle that is beveled, you have a larger diameter portion on one side and a smaller diameter portion on the opposite side. You want the smaller diameter part facing in toward the geared hub.

  3. If you have not removed the old seal, look carefully at how it is installed and you will see what I mean. To remove the seal, there are some special tools or you can use simple tools like I did. I took a metal punch and made a hole in the metal seal and pried it loose. I had to do this several times to finally get the seal out. You don't care if you tear up the old seal.

  4. To install the new seal after you have figured out which way in goes in, again there is a special tool or a simple tool. I very gently with a hammer tapped the edge of the seal just so it would stay in place on the geared hub. I than took a small piece of 2X6 wood about 8 inches long and put it flat up against the seal and hit the piece of wood with the hammer. It took a couple of hits with the hammer to get it flush with the geared hub. It has to be recessed slightly in the geared hub so I gook a 1 inch wooded dowel and gently tapped around the edge of the seal to seat it.

That's it.

Gary 94 Hummer


Any one who has tried to change these knows it a real PIA to press the new seal in without the right tool. Well, after two tries, read two trashed seals, I decieded to lightly taper the outter edge ever so slightly, maybe 1/8" near the base, Cut a price of tubing approx 3/4" that matches the diameter of the seal and used the flang as the surface to strike to press the new seal in. Bingo, went right in without twisting. New flang seal, those little blue seals, new nords for the rotor. On the road again...

Eric


Yeah I had to taper the outer edge of the seal myself. After grinding a bit of a taper into it and cleaning it up, I used the diff support bracket and bolts to "press" it in place.

My track has the support brackets that have to be removed in order to get at the output seals. It's a pain to have to remove it BUT it does come in handy to "press" the new seal in place. It presses about 180 degrees of the seal leaving me to tap in the other side as I slowly tighten down the bracket. Once it bottomed out, I removed the bracket and drove the seal the rest of the way home with an appropriate sized pipe coupling.

David


Back to main page

The Hummer Knowledge Base is a collection of informative posts from the Hummer Network forums and mailing lists, contributed material and links to outside web sites.
The Hummer Network is not responsible for the accuracy of the information contained herein or on outside web sites, nor for any situation arising from the use thereof.
© 2006-2011 by The Hummer Network. No material from the Hummer Knowledge Base may be reprinted or republished in any form without permission.