| Forum | Marketplace | Knowledge Base | | H1 site | H2 site | H3 site | |

The Hummer Knowledge Base
|
In 1997 AM General added components to their trucks to enhance the heating, air conditioning and ventilation. On the wagon behind the side rear windows are exhaust vents. These vents let air flow through the truck and out the back. They consist of 2 pieces, an exhauster and a cover. On the front right side of the truck is a louvered air inlet. A scoop has been added which greatly increases the air flow into the truck. All you need is the aluminum formed scoop. They do sell an assembly which is a frame with an expanded metal grate (06008699+P @ $47) but it is of no real use because the existing inlet louver is sufficient. The parts you need to order are:
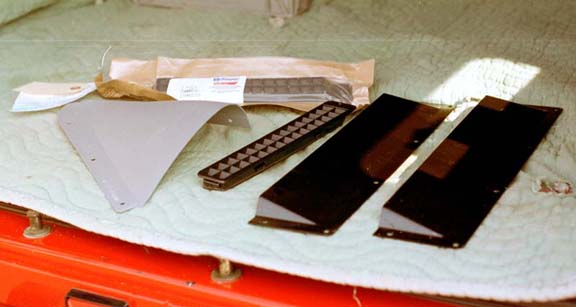 You may be able to get the vents a little cheaper through a Chrysler dealer. The left and right exhauster vents are Chrysler parts. The right vent is a Mopar 55008540, the left vent is a Mopar 55008541. There is a 50987 on each label.
I ordered the parts from Lynch Hummer (800) 727-9466. I called my order in on Monday or Tuesday and had the parts on my doorstep by Friday.
EXHAUSTER VENTS
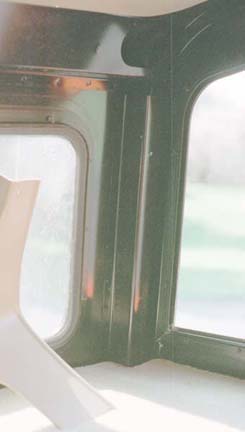 The first thing you do is take off the inside plastic trim which covers the top right and left rear corners of the wagon. Put these aside. Take note that there is a square vertical support now exposed at the rear corner of the body and that this support is open at the top. Also note the trim screw hole.
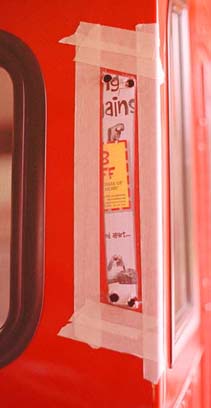
Next make templates using the exhauster vents as guides. Be sure to take into account the extra length that will have to be cut out on the exhauster vent top below it’s mounting screw hole. Positioning the template is probably the most critical part of the installation. For the sake of this discussion I will describe the installation of the left (drivers) side vent. The hole has to be cut so that it is completely within the square vertical corner body support. What I did is drill an 1/16" locator hole through the outside body from the inside. I used the inside trim screw hole as a positioner. As I inserted the drill bit through the hole I aimed it to the right till I hit the inside of the support. This way the hole would come through the front at a point within the body support at its edge. I taped the template to the outside of the body about 1/16" to the left of the locator hole and a little higher then the vertical center between the top and bottom of the window frame. I tried to position the vent as high as I could without interfering with the exhauster vent cover because the air will be drawn out of the truck through the opening at the top of the corner support. I then drilled a 3/8" hole at each corner of the template using a center punch to locate the starting position of each hole. I then covered the area adjacent to the cut with masking tape so the sawzall wouldn’t scratch the surrounding paint.

I carefully cut along the edge of the template. The cut was like butter because the body is aluminum. I then used a file to cleanup the hole and fine tune the fit. I placed a bead of silicone seal around the inside of the flange before I pressed the vent into place. Just drill a pilot hole and secure the vent with a sheet metal screw and this phase is done.

VENT COVERS The next step is to install the vent covers. I elected to leave mine black. I gave both a couple of extra coats of black spray paint before I mounted them. Mount the cover vertically centered with the side windows and about 1/16" back from the rear edge of the truck. The 4 holes on the left will go through the body into the inside of the truck. Use the 10-24 machine screws with washers, lock washers and locktite to secure. Use the SS sheet metal screws to secure the other 2. I used a small bead of silicone seal around the inside of the cover before it was mounted.
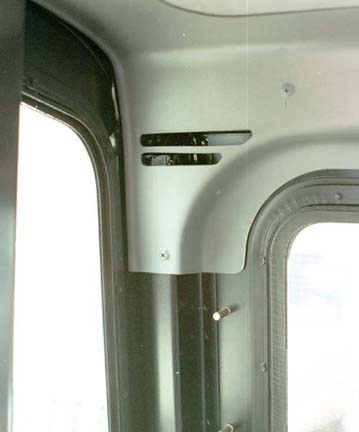
INSIDE SLOTS The last phase of the rear vent install is to cut a few holes or slots in the corner of the inside trim. This is necessary so the air gets to the vent. The top of the upper slot should line up with the bottom edge of the horizontal frame support. I drilled a couple of ½" holes on either end and used a coping saw and some files to complete the slots. Remount the inside trim and you’re done.

FRONT AIR SCOOP The scoop comes in primer gray. The first thing I did was to paint the inside surface black. Then I painted the outside red and wet sanded it. This will be a base coat. I decided that I didn’t want to remove any factory rivets so I located all the rivet heads and drilled holes in the scoop so the heads would fit. I then drilled 2 more screw holes to mount the scoop. I fastened the scoop to the truck with 6 SS sheet metal screws. I’ll use body filler to smooth over the holes with the rivet heads and paint the scoop to match the truck.
A final note. Your air flow will increase more then you could imagine. With the fan off traveling on the highway I get a nice flow of air out of the floor vent. When I turn on the heat it’s a blast. When its cold and humid out the windows will fog up because humid air flowing through the truck condenses on the cold glass. Whenever you set your vents to defrost the A/C is supposed to come on to dehumidify the air. If the outside temperature is colder then around 50 the air will not come on because there is an Ambient Temperature Switch in series with the A/C clutch. When the temperature is warm the switch conducts, when cold it’s open. According to the dealer this switch was installed too keep the auxiliary heater/cooler from blowing cold air when it’s cold outside, when the defroster is activated. Otherwise there is no problem with deactivating it. The sensor has a white and blue wire. You can disable it by unplugging it from the body harness by the Filter Drier and just plugging the two connectors at the drier together.
|