|
Fan Removal Without Removing Radiator Stack:
MODEL:
HMMWV
SUBJECT: Fan Drive and Fan Blade Replacement
COMMENTS:
A. It’s been brought to our attention that the fan drive and fan blade can be removed as an assembly with the radiator and fan shroud in-vehicle. This will save units repair time, improve your vehicle readiness and help alleviate any work overload at unit maintenance.
B. Below is the new procedure. It eliminates the task to remove radiator and fan shroud before beginning the task.
Helpful Note:
The fan drive hose may be modified to add a quick-disconnect at commander’s discretion. Refer to TB43-0001-39-3, Dec 94. This will make it easier to apply compressed air to disengage fan drive clutch if necessary.
PROCEDURES:
Initial Setup:
Special Tools Manual References
Hex Head driver, 8mm TM9-2320-280-20P (Appendix B, Item 119)
Materials/Parts Equipment Condition
Four lockwashers (Appendix G, Item 108)
Hood raised and secured (TM9-2320-280-10)
Sealing compound (Appendix C, Item 43)
a. Removal
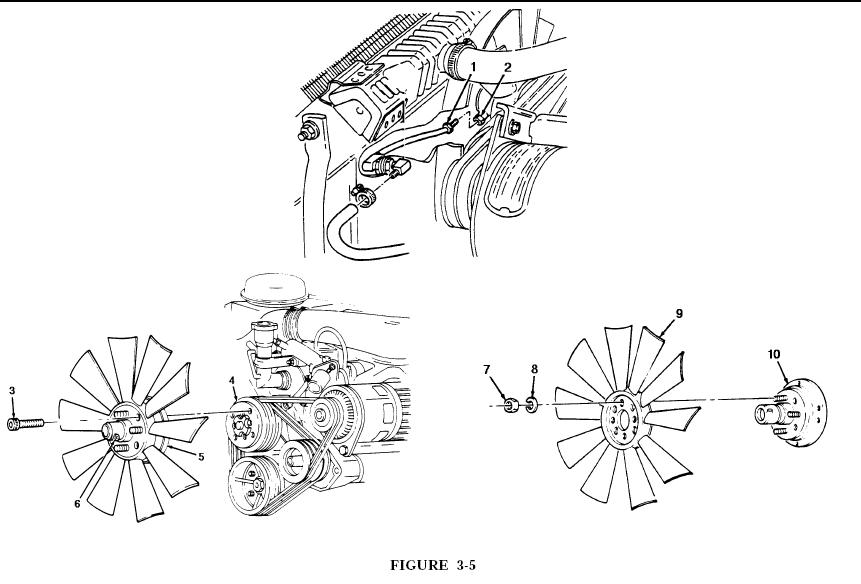
1. Disconnect fan drive hose (1) from fan drive (2). (see figure 3-5)
NOTE
Mark position of fan blade for installation.
It may be necessary to apply compressed air to clutch adapter. This disengages fan drive clutch to allow access to socket head screws.
2. Using hex head driver, remove four socket-head screws (3) and fan drive assembly (5) from water pump pulley (4). (see figure 3-5)
3. Remove four nuts (7), lockwashers (8) and fan blade (9) from fan drive (10). Discard lockwashers (8).
b. Inspection
Inspect clutch adapter (6) and fan blade (9) for damaged threads, cracks, bent blades, or breaks. Replace if defective.
c. Installation
1. Align fan blade (9) onto fan drive (10) with four lockwashers (8) and nuts (9). Tighten nuts to 26 lb-ft (35 N·m).
2. Apply sealing compound to four socket-head screws (3) and install fan drive assembly (5) to water pump (4). Tighten socket-head screws (3) to 45 lb-ft (61 N·m).
3. Connect fan drive hose (1) to fan drive (2).
FOLLOW-ON TASK:
Lower and secure hood (TM9-2320-280-10)
Bleed power steering system (para, 8-24)
PUBLICATIONS AFFECTED:
TM9-2320-280-20-2
|
